Heavy Civil companies know how important it is to get regular inspections done to protect their equipment, their crews, and their jobs. But the truth is, just getting inspections sent into the office isn’t enough to stay compliant and competitive in 2024.
We've detailed in our previous article on how equipment QR codes streamline inspections:
- Teams can't effectively protect their crews and fleet if equipment is inspected using the wrong form or operators are putting in the wrong equipment name.
- How big hazards can happen if crucial equipment parts are not being looked at due to people using the wrong inspection form or an inspection form that is too generic.
- How equipment in good condition can be downed if Operators accidentally input the wrong Equipment Code.
As a Safety Pro reviewing Inspections, it’s hard to find when admin issues like these happen since your team can easily be receiving hundreds of inspections per week. You could save yourself hours of monotonous admin work and better protect your crews if there was an easy way to make sure that people could always know the right inspection form to use and the correct equipment name.
Introducing Scan to Inspect
This new Scan to Inspect workflow makes it easier than ever for people in the field to instantly pull up the linked Inspection for every piece of equipment. No more scrolling through long lists to find the right Equipment Code or Inspection, now operators just have to walk up to the equipment they plan to use and scan the QR code on the equipment to start an Inspection.
Here's how it works:
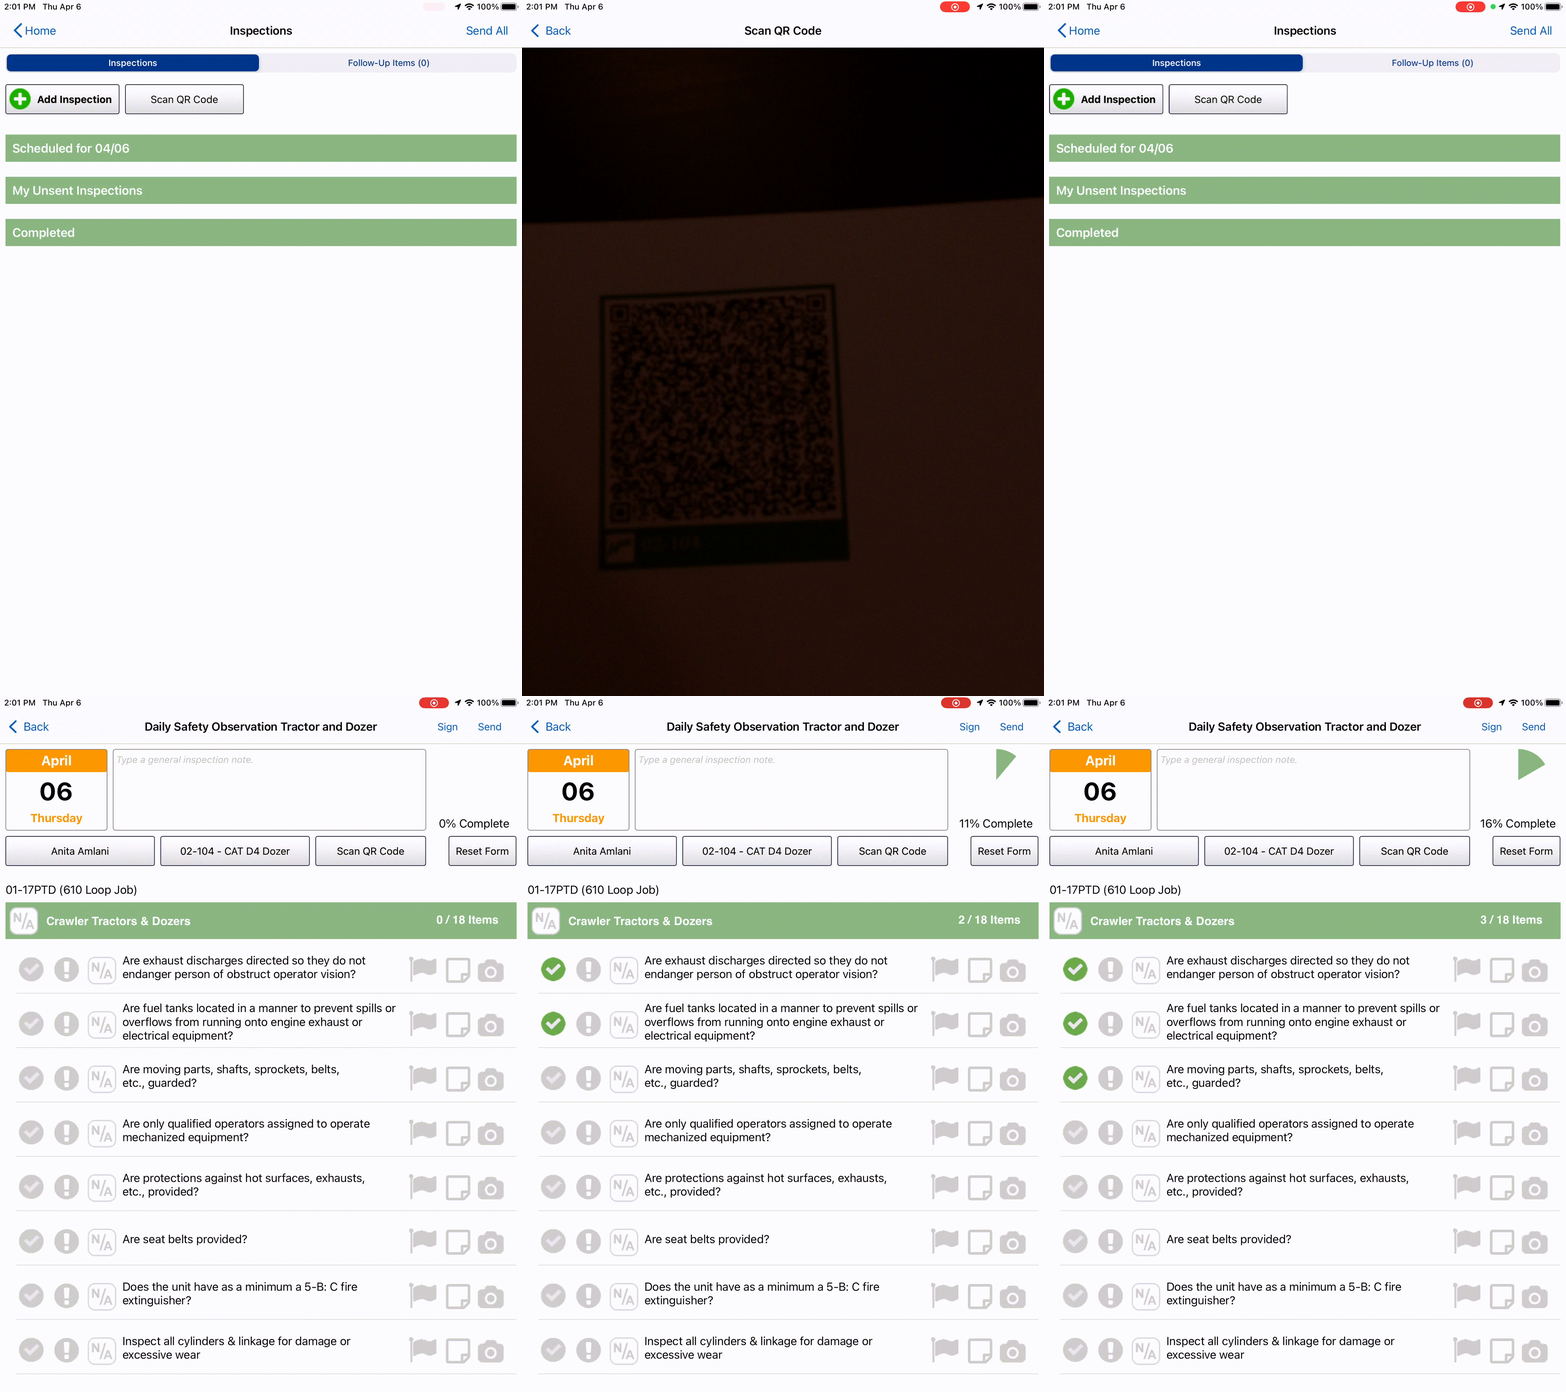
- In HCSS Field, click the "Scan QR" button in the Inspections module, which opens your camera.
- Scan the QR code, which then shows in HCSS Field either the linked inspection forms for that piece of equipment or if there is only one inspection form linked, it takes you straight to that inspection.
- Inside the inspection form, you can see that the equipment name is already filled in so all the operator has to do is begin the inspection.
This is the main workflow, but there are more workflows that help cover other inspection scenarios.
Workflow |
What it’s good for |
How to start it |
1. Scan to Inspect |
Quickly pulling up linked inspection form(s) and pre-filling the equipment name |
Use the “Scan QR” button in the Inspections module |
2. Scan for Equipment Details then Inspect |
Viewing the Equipment Details page before starting the Scan to Inspect workflow |
Open your camera app and then scan the QR code |
3. Scan inside an Inspection Form |
Filling in the equipment name in an inspection form that is not linked. Useful for mechanics or safety supervisors that may have specialized forms not everyone needs to use |
Select an Inspection form and use the “Scan QR” button to fill in the equipment name |
4. Filter Equipment List to Inspect |
Lets users see linked inspections for a piece of equipment. Useful for teams that don’t use QR codes or the event of a QR code is damaged or missing. |
Navigate to the Inspection form list, click “Equipment”, and then select the equipment name to filter |
Instead of waiting until all workflows are finished for all device types and mobile operating systems, we are releasing the functionality as we finish.
- Workflow 3 is available on the already released version 2023.2.0 for phone and tablet.
- Workflows 1, 2, and 4 are available on version 2023.7.0 on iOS tablets. Workflows for the iPhone and Android phones/tablets are expected to be available in later versions.
Scan for Equipment Details then Inspect
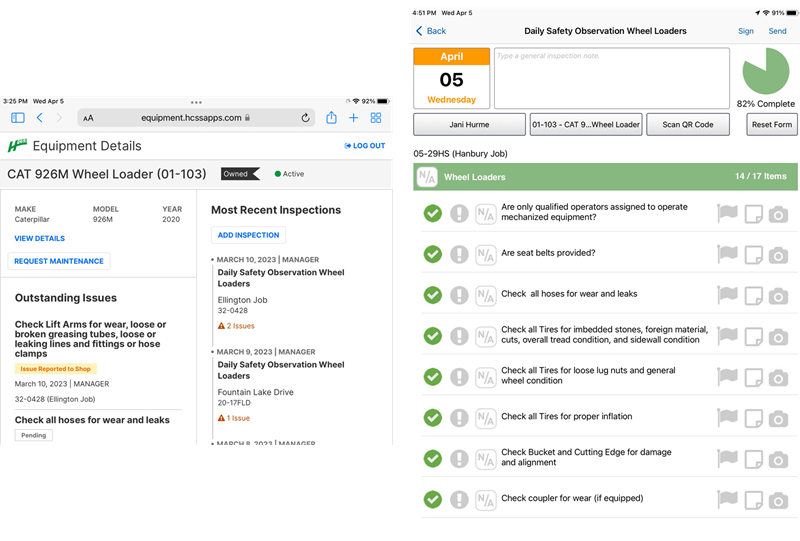
When equipment is new on the jobsite or when a mechanic is doing maintenance, often you want to know when Equipment was last inspected or if there are any Outstanding Issues. You can see this information on the Equipment Details page. This page has existed for years and has been accessible with the Equipment QR code. We’ve kept that workflow and integrated it into Inspections.
- Open your camera app
- Scan the QR code, which then shows the Equipment Details page where you can view recent inspections and any outstanding items. Then you click “Add Inspection”, which then shows in HCSS Field either the linked inspection forms for that piece of equipment or if there is only one inspection form linked, it takes you straight to that inspection.
- Inside the inspection form, you can see that the equipment name is already filled in so all the operator has to do is begin the inspection
Scan Inside an Inspection Form
There are certain inspection forms that don’t need to be used day to day or only need to be used by people in certain roles, like mechanics or safety professionals. In this case, a user would want the ability to choose the Inspection they know they need and be able to scan a QR code to automatically fill in the equipment name, so they save time and know they have the right equipment code.
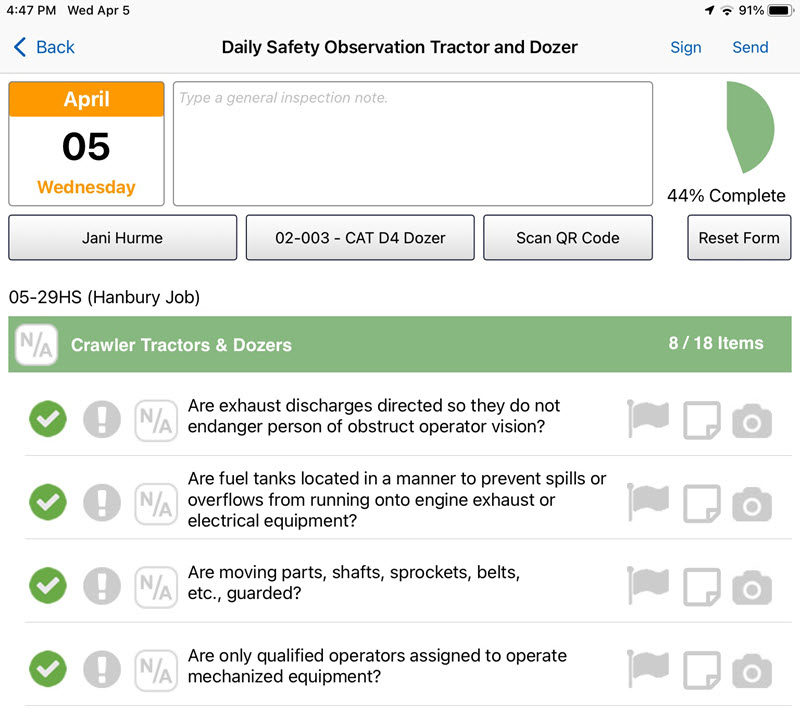
- Select the Inspection Form that you want.
- Click the "Scan QR" button to open your camera app and scan the code.
- Now the camera app closes and you can see the equipment name is filled in on the Inspection.
Filter Equipment List to Select
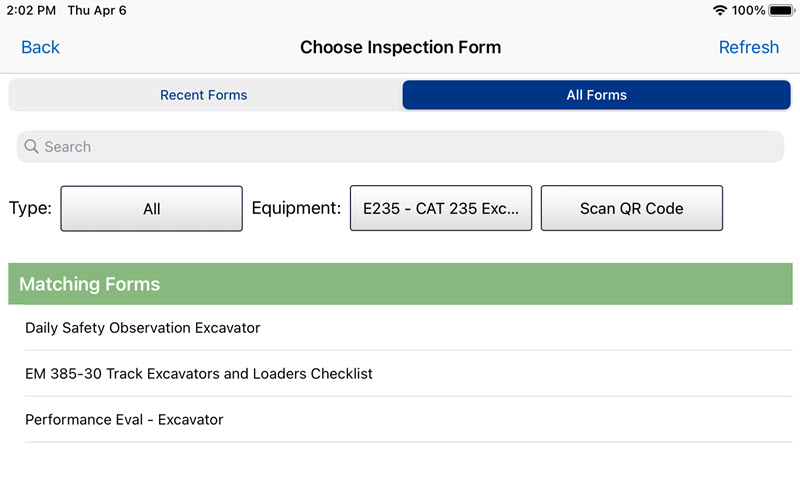
- Inside Inspections, click “Add Inspection” to go to the Inspection list.
- Click “Equipment” and select the piece of equipment you will inspect. Once you select, the list of inspection forms will be filtered to show the linked inspection form or forms.
- Choose the Inspection you want to complete and the equipment name will already be filled out inside the Inspection form.
Easy Inspection Linking to Save You Time
Before your teams in the field can start saving time with linked inspections, safety professionals first need to link Inspection forms to equipment. Whether you have 20 or 20,000 pieces of equipment, it’s easy to quickly connect your inspections to your equipment.
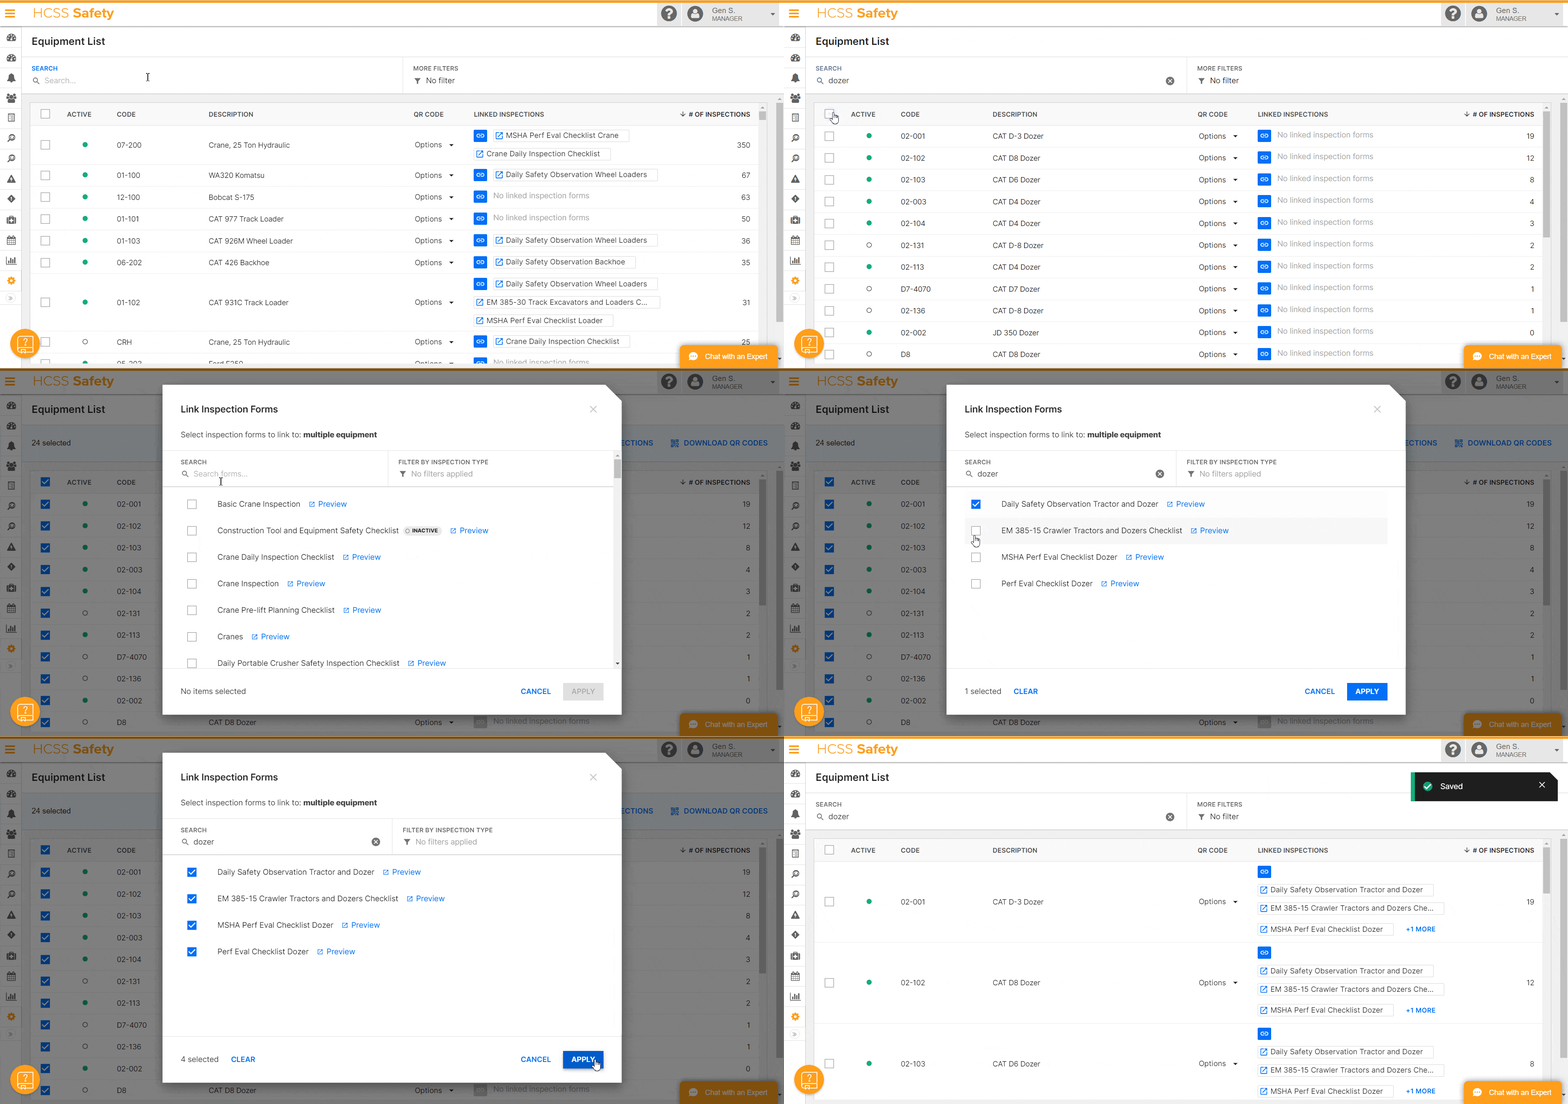
- Navigate to Setup > Equipment to find the Equipment List page. This is where you can easily download QR codes, view Equipment Detail Pages, and click to sort your columns.
- You can use the search bar or click on column headers to filter the Equipment on the table. Then, you can select one, many, or all pieces of equipment on that page.
- Once you have selected the equipment you want to link to inspection forms, click the blue link icon to pull up the linking screen.
- You can choose to search by name or filter by inspection type to find the Inspection forms you’d like to link. If you aren’t sure what is in each Inspection Form, you can click the Preview link to review the Inspection contents.
- Once you select all the Inspections you want to link to the Equipment, hit Apply to link your selected inspections to the equipment.
That's all you need to get started!
Tips to Roll Out to Your Team
Safety Pros may want to schedule a meeting with their full team to decide how best to roll out this functionality. There are a few points you may want to cover:
- Is your strategy to link just one inspection form so users are taken directly to that inspection, or do you need multiple inspection forms and may need to rename your inspections for quick decision-making in the field? (Ex: Backhoe Checklist - For Mechanics or Backhoe Checklist - MSHA)
- Should you use a sticker printer or get metal engraved for new QR codes? How do you get any new QR codes out to the field or shop?
- How do you train teams on how to find inspection forms linked to equipment (Workflow 4) if a QR code has been damaged?
- Who on your team links inspection forms to new Equipment that is bought or rented?
- Are there inspection forms that you want to make more specific now or in the future for equipment that has extra elements to it? (Ex: Some Carry-Deck Cranes have a secondary set of hydraulics while others don’t, and it’s hard for every operator to know that off-hand.)
Quick Inspection Linking FAQs
- Do all Inspections show up as a linking option on the Equipment List?
- No. You can You can only link inspection forms that are Equipment related. You can check what Inspection Types have equipment enabled in Setups by looking for the checkbox seen below.

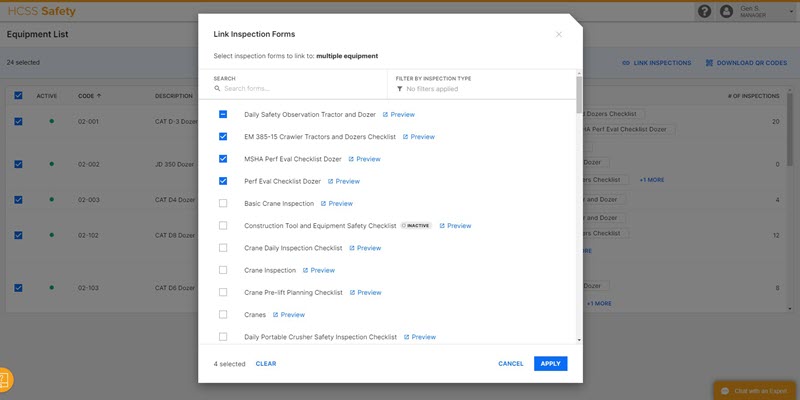
2. When I am adding Inspections to multiple Equipment, sometimes I see a blue box with a line through it. What is that?
- When you select multiple Equipment, some of them may already have inspections applied to them. This blue box with a line through it means that some Equipment but not all have that Inspection linked. You can remove that Inspection form from all Equipment currently selected by clicking the box, which clears the selection. You can apply that Inspection to all Equipment by clicking the box again, which will then show a check mark.
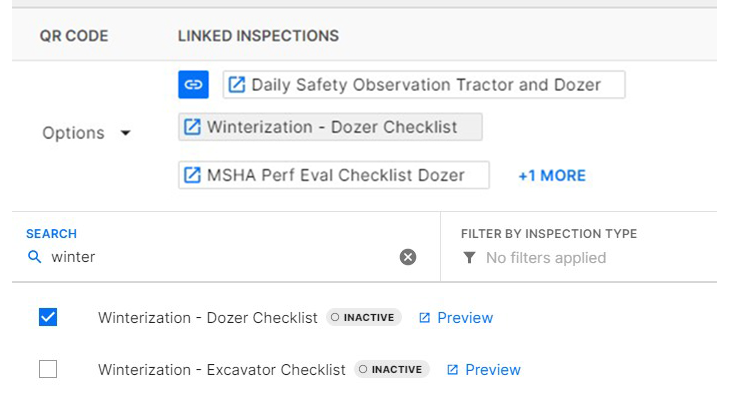
3. Why do I see some Inspections on the Equipment table in gray?
- When you see an Inspection form in gray that indicates that the Inspection itself is inactive. Inactive inspections will stay linked to equipment and are viewable on HCSS Safety web but do not show on mobile until they are changed to an active status. This lets you have many linked equipment inspections that you can easily hide from crews by making the Inspections inactive when you are making edits or if they are only relevant at certain times of the year.
Your Ideas and Questions
If you have any other questions about how to start using this new tool to streamline inspections and protect your people, reach out to support by phone.
HCSS Support:
- Estimating: 855-231-7876
- Fleet: 855-231-7877
- Operations: 855-231-7878
If you have ideas on how to improve this tool or increase the safety culture for your team, please share your thoughts on Ideas.

